A login form is one of the most important elements of any website that restricts access to specific areas or features. It allows authorized users to log in securely and interact with the site. For any login-protected platform, the login or sign-up page is typically the first interaction a user has, so it’s essential to make it both visually appealing and easy to use.
In this tutorial, you’ll learn how to create a simple, elegant login page using only HTML and CSS—no JavaScript or external libraries needed.
Why Build a Pure CSS Login Page?
Designing your login page with pure CSS has several advantages:
🔹 Faster Load Times
By avoiding JavaScript and heavy frameworks, your login page will load faster. This is particularly beneficial for users on slower mobile networks.
🔹 Easier Maintenance
With fewer dependencies, there’s less code to update or debug. You don’t need to worry about library updates or version conflicts.
🔹 Simplicity and Accessibility
A pure CSS approach ensures your page remains lightweight, responsive, and accessible—perfect for beginners and professionals alike.
In short, a Pure CSS Login Page makes your site faster, easier to maintain, and more user-friendly.
Prerequisites
Before you begin, make sure you:
- Have a basic understanding of HTML and CSS.
- Use a code editor such as Visual Studio Code, Sublime Text, or Atom.
- Save your HTML and CSS files with proper extensions (
.htmland.css).
To get started, we will first need to create a basic HTML file. In this file, we will include the main structure for our login form.
After creating the files just paste the following codes into your file. Make sure to save your HTML document with a .html extension, so that it can be properly viewed in a web browser.
Setting Up the HTML
Create a new HTML file for the login form’s structure and save it with a .html extension.
Key Elements:
-
<!DOCTYPE html>– Defines HTML5 document type. -
<html lang="en">– Specifies language as English. -
<head>– Includes meta tags, title, and links tostyles.css. -
<body>– Contains the form layout with fields for username, password, a login button, and a signup link.
That’s your basic HTML setup—next, you’ll add the CSS for styling.
Step 1: HTML Structure
Start by creating a new file named index.html. This file will define the basic structure of your login page.
Here’s the complete HTML code:
Explanation of the Structure
<!DOCTYPE html>: Defines the document type as HTML5.<html lang="en">: Wraps the entire HTML document and specifies English as the language.<head>: Includes meta information like the title, character encoding, and linked CSS file.<body>: Contains all the visible content of the webpage.
Inside the body:
.containerand.centerare wrapper elements for layout and positioning.<form>: The login form uses the POST method to handle user input.- Input Fields: Two fields for username and password.
- Buttons and Links: “Forget Password?” and “Signup” links, plus a submit button.
With the structure in place, let’s move on to styling.
Step 2: CSS Styling
Now, create a new file called styles.css. This file controls the look and feel of your login page.
Paste the following code inside styles.css:
body {
 margin: 0;
 padding: 0;
 font-family: Roboto;
 background-repeat: no-repeat;
 background-size: cover;
 background: linear-gradient(120deg, #007bff, #d0314c);
 height: 100vh;
 overflow: hidden;
}
.center {
 position: absolute;
 top: 50%;
 left: 50%;
 transform: translate(-50%, -50%);
 width: 29vw;
 background: white;
 border-radius: 10px;
}
.center h1 {
 text-align: center;
 padding: 0 0 20px 0;
 border-bottom: 1px solid silver;
}
.center form {
 padding: 0 40px;
 box-sizing: border-box;
}
form .txt_field {
 position: relative;
 border-bottom: 2px solid #adadad;
 margin: 30px 0;
}
.txt_field input {
 width: 100%;
 padding: 0 5px;
 height: 40px;
 font-size: 16px;
 border: none;
 background: none;
 outline: none;
}
.txt_field label {
 position: absolute;
 top: 50%;
 left: 5px;
 color: #adadad;
 transform: translateY(-50%);
 font-size: 16px;
 pointer-events: none;
}
.txt_field span::before {
 content: '';
 position: absolute;
 top: 40px;
 left: 0;
 width: 0px;
 height: 2px;
 background: #2691d9;
 transition: .5s;
}
.txt_field input:focus~label,
.txt_field input:valid~label {
 top: -5px;
 color: #2691d9;
}
.txt_field input:focus~span::before,
.txt_field input:Valid~span::before {
 width: 100%;
}
.pass {
 margin: -5px 0 20px 5px;
 color: #a6a6a6;
 cursor: pointer;
}
.pass:hover {
 text-decoration: underline;
}
input[type="Submit"] {
 width: 100%;
 height: 50px;
 border: 1px solid;
 border-radius: 25px;
 font-size: 18px;
 font-weight: 700;
 cursor: pointer;
}
input[type="Submit"]:hover {
 background: #2691d9;
 color: #e9f4fb;
 transition: .5s;
}
.signup_link {
 margin: 30px 0;
 text-align: center;
 font-size: 16px;
 color: #666666;
}
.signup_link a {
 color: #2691d9;
 text-decoration: none;
}
.signup_link a:hover {
 text-decoration: underline;
}
.HomeAbout {
 width: 100vw;
 height: 25vh;
}
CSS Overview
-
Body Styling:
Applies a modern gradient background, removes default margins, and uses the Roboto font for a clean appearance. -
Centering the Form:
Uses absolute positioning and transforms to perfectly center the form both vertically and horizontally. -
Input Fields:
Smooth animations when focusing on inputs, with a blue underline appearing dynamically. -
Submit Button:
Rounded corners, a hover color transition, and a modern flat design. -
Links and Labels:
Subtle hover effects for better interactivity and user experience.
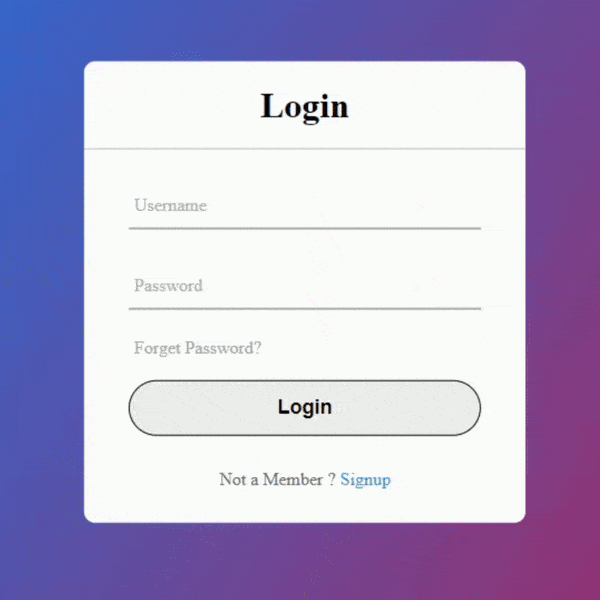
Final Result
After saving both files (index.html and styles.css), open your HTML file in any web browser. You’ll see a responsive, modern login form centered on the screen with animated input labels and a smooth color transition.
Conclusion
In this tutorial, you learned how to design a Simple Pure CSS Login Page from scratch.
We covered:
-
Setting up the HTML structure
-
Styling the form using CSS
-
Adding animations and interactivity without JavaScript
By using pure CSS, you create a fast, lightweight, and easy-to-maintain login page suitable for any web project.
Now that you’ve mastered this, try customizing the design—experiment with colors, fonts, and layouts to make it uniquely yours!