Master Excel tables and analyze your data quickly and easily. Learn how to insert, sort and filter a table, and how to display a total row at the end of a table.
Excel tables are a great way to organize and analyze data. They provide a number of benefits, including:
- Structure: Tables have a defined structure, which makes them easy to read and understand.
- Formatting: Tables can be formatted to make them look more professional and visually appealing.
- Calculations: Tables can be used to perform calculations on data, which can save you time and effort.
- Filtering: Tables can be filtered to display only the data you want to see.
- Sorting: Tables can be sorted to arrange the data in a specific order.
- Pivot tables: Tables can be used to create pivot tables, which are a powerful tool for data analysis.
Create a Table
To insert a table, execute the following steps.
1. Click any single cell inside the data set.
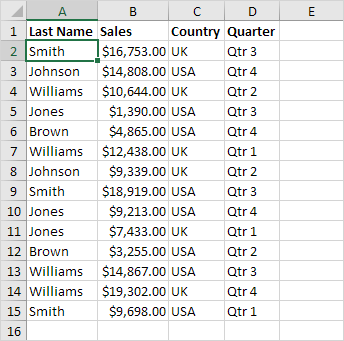
2. On the Insert tab, in the Tables group, click Table (or simply press Ctrl + T).

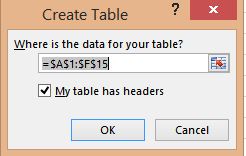
3. Excel automatically selects the data for you. Check ‘My table has headers’ and click on OK.
Result. Excel creates a nicely formatted table for you. This may still seem like a normal data range to you but many powerful features are now just a click of a button away.

Sort a Table
To sort by Last Name first and Sales second, execute the following steps.
1. Click the arrow next to Sales and click Sort Smallest to Largest.
2. Click the arrow next to Last Name and click Sort A to Z.
Result.

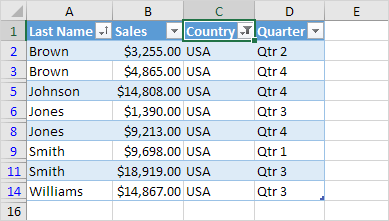
Filter a Table
To filter a table, execute the following steps.
1. Click the arrow next to Country and only check USA.
Result.
Total Row
To display a total row at the end of the table, execute the following steps.
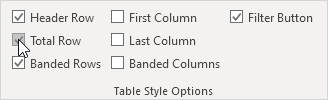
1. First, select a cell inside the table. Next, on the Design tab, in the Table Style Options group, check Total Row.
Result.
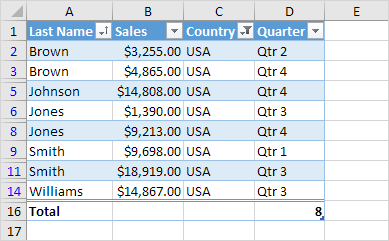
2. Click any cell in the last row to calculate the Total (Average, Count, Max, Min, Sum etc.) of a column. For example, calculate the sum of the Sales column.
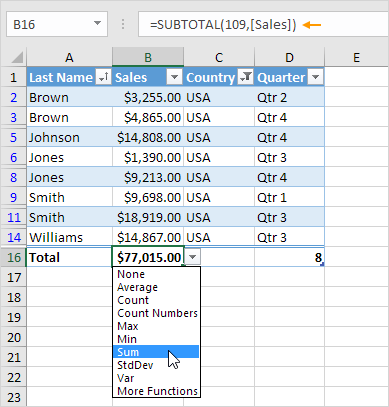
Note: in the formula bar see how Excel uses the SUBTOTAL function to calculate the sum. 109 is the argument for Sum if you use the SUBTOTAL function. Excel uses this function (and not the standard SUM function) to correctly calculate table totals of filtered tables.
Table Name
Each table has a unique name. You can use this name in formulas. If you like, you can edit the name of a table.
1. First, select a cell inside the table. Next, on the Table Design tab, in the Properties group, we can see that Table1 is the name of this table.

2. The formula below refers to Table1 and counts the total number of records.

Note: visit our page about structured references to learn more about table formulas.
Auto Expansion
Tables in Excel expand automatically when adding new rows or columns. This is a great feature.
1. First, select a cell inside the table.
2. Press Ctrl + Shift + T to quickly remove the total row.
3. Select cell A16 and type Brown (Excel automatically formats this new row for you).
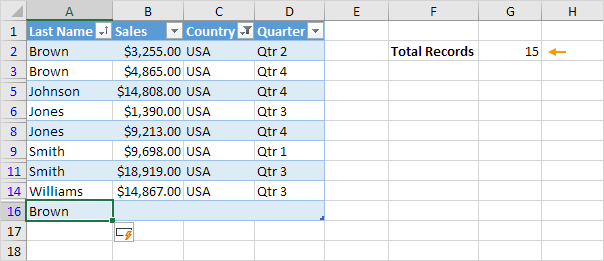
Conclusion: this new row is automatically part of the table. All formulas referring to Table1 will be updated automatically (see cell G2). Wow!
Excel will create a table and apply a default table style to it. You can then customize the table’s formatting as needed.
Additional Tips on Tables
Here are some additional tips for working with Excel tables:
- Use table names: You can give your tables names, which can make it easier to refer to them in formulas and other parts of your workbook.
- Use table relationships: You can create relationships between tables, which allows you to link data from different tables together.
- Use data validation: You can use data validation to restrict the values that can be entered into cells in a table.
- Use conditional formatting: You can use conditional formatting to highlight cells that meet certain criteria.
Excel tables are a powerful tool for data analysis. By using tables, you can organize your data, perform calculations, and create visualizations that help you to understand your data better.
Here are some examples of how you can use Excel tables for data analysis:
- To track sales data: You can create a table to track sales data by product, region, or salesperson. You can then use the table to calculate sales totals, average sales, and other metrics.
- To analyze customer demographics: You can create a table to track customer demographics, such as age, gender, and location. You can then use the table to identify trends and patterns in your customer base.
- To compare product performance: You can create a table to compare product performance by sales, profit, or other metrics. You can then use the table to identify which products are performing well and which products need improvement.
| Next Chapter: What-If Analysis |

